Monday, November 19, 2018

Text Advertising - Doing it the Right Way

As several of our customers have found out in the past, we did not offer an option in the program to send text message advertisements. This blog post will explain why that was as well as detail how we’ve chosen to implement a text advertising feature that is easy to use while still meeting all of the legal requirements that go along with text advertising.
Our story starts back in 1991 when the US government passed the Telephone Consumer Protection Act (or TCPA). While originally intended to apply to automatic dialing systems, the Ninth Circuit held that the TCPA applies to unsolicited cellular telephone text messages as well.  So what does this mean? This means that unless you get express, documented consent from a customer then you can not legally send them text advertising. While texts of an informational nature are protected by existing business relations (for example, texts notifying someone of their appointment time) any text that could be construed as an advertisement requires customer consent.
You may think, “But my customers aren’t going to complain…and even if they do it’s no big deal, right?”. Definitely not right! There have been a few companies that made that mistake and paid in a big way. Papa John’s Pizza was approached by an advertising company that didn’t know the law and offered the opportunity to increase their sales through text advertising to everyone that had called to order pizza. Their final bill once they reached a settlement? $16.5 million. Before that, Jiffy Lube had an even larger bill – $43 million!
Digging into the details on both of these you find the same two problems – a lack of understanding of the laws that cover proper usage of text messaging and a lack of respect for their customer’s wishes. No one likes to get unwanted messages and our laws back up those wishes. That said, navigating those laws and implementing a policy that ensures you don’t run into the same type of expensive problems I mentioned earlier can be difficult and take time away from where you’d rather spend it – with your customers!
We understand that our salons don’t spend their time researching telecom laws and best practices and wanted to make sure that we didn’t add a feature to the program that could get our customers in trouble with their customers or even worse yet, get sued for misusing text messaging. For a long time we chose not to allow text messaging as we didn’t want to open salons up to the risk nor require them to put expensive policies in place to ensure they followed the letter of the law.
That all changes now though! We’ve come up with a well designed system that removes most of the compliance work from the salon’s plate, ensures that customers don’t receive unwanted text messages, and allows you to follow the letter of the law without having to know what that law says!
So on to the details of this new feature. Our Text Message Advertising program works with the Customer Online Booking that many of our salons already use. Because of the limitations of the ways that customer records can be handled it does require the Customer Online Booking to operate.
For customers using one of our business’ online booking pages opting in and out of receiving text messages is as easy as logging into their account and clicking two links to get to the opt in screen! There they can see the information about the text advertising program, read privacy and terms of services pages customized to your business, and opt in or out of receiving both text confirmations and text advertisements. In addition, if you don’t already have the customer’s cell phone number and text carrier they’ll be prompted to enter it then.
Once a customer has opted in to the text advertising, they will receive text messages whenever the salon clicks on the “Send Text Message to All Customers” or “Send Text Message to Specific Customers” buttons (in the latter case only if they’re one of the specific customers selected). When you can use these buttons are governed by the agreement the customer signs on to originally and the laws. This means that if you’ve already sent out two text messages that week the program will make you wait until a week has past since the first one before allowing you to send out another. In addition, the program will stop you from sending out text messages before 8am or after 9pm.
Lastly, there’s a new section under Customer Display / Check In that allows you to opt customers out of the text advertising program. This is very important as customers can text the word STOP as a reply to your text messaging and legally you are required to immediately opt them out of the program. This is the one part that does require involvement on our business’ end of things. First, it’s very important that there’s always someone working at the business whose job includes checking replies from customer emails sent out through our program. If someone receives one of these STOP messages the message will include the customer’s cell phone number in the address. You can pull the customer up by this phone number by going to Customer Display and typing the phone number in the following format: (###) ###-####. That’s the area code in parenthesis, a space, and then the last 7 digits of the number with a dash in the middle. Type their number in that format, hit the Enter key on the keyboard, and a list of matching customers will show up in the white box below. Once you pull up the customer, you should click the button right beneath the cell phone number area to opt them out of the program, and then either click No for text messages or change their carrier to No Text Messages. Customers may also text the word HELP to you – in that case you should text them back your business’ contact information so they can reach out to you for further information.
That’s it! We’ve taken care of all the other worries for you. As long as you make sure to take care of the STOP and HELP requests from customers the program takes care of all the other legal concerns for you and makes it possible for you to reach your customers in a new way without worrying about the legal and technical details. Because of the setup involved this feature must be turned on with our support team after we ensure everything is in place for you to use the text advertising program. Please contact support to get started.

Thursday, September 14, 2017

New Feature - Calendar Updates

We've made an exciting addition to all of our emails that update customers about their appointments. Now, each of your booking, confirmation, and find appointment emails will include a calendar .ics file. For your customers that have a calendar set up on their computer or phone, they can click on this file attached to the email and have the information about their appointment automatically added to their calendar.

Click here for more information on .ics files and as always if you have any questions don't hesitate to contact tech support.

Tuesday, July 25, 2017

New Feature - Scheduled Emails

We've added an exciting new feature to our existing Email Program - Scheduled Emails! Have an email you want to make sure goes out next week? Have that special event coming up that you want to make sure your customers remember? Scheduled Emails are for you!

Setting up Scheduled Emails is almost as easy as sending emails out immediately. Just go to the Send E-mail button at the top of the screen and then choose Add Scheduled Email on the right side. Once there you just need to pick a date to send the email, a subject, as well as optionally selecting employees, dates, and all/new/existing customers. Then click Create Message to open the familiar Email screen, create your email, and click Save. It's that easy!

Once your Scheduled Email is created you're done - the email will automatically be sent out in the early morning of the selected date. If you need to make any changes you can get back to a list of your Scheduled Emails with the Modify Scheduled Email button. Even better, this list shows all your Scheduled Emails - even the ones that have already been delivered - so if you'd like to send out an old email again it's as easy as picking that one from the list, selecting a new Send Date, and clicking Save.

We hope this new feature helps everyone out and allows you to create your marketing as you have time and deliver the emails when it's best for you. As always, if you have any questions don't hesitate to contact Technical Support.

Thursday, June 1, 2017

Premium Online Booking

We've often had requests for new features for the online booking. As we responded to those requests the online booking has grown - from the entire employee access section to new methods for booking groups we've added more and more value to the online booking.

There's been a few requests that we haven't been able to add to the regular online booking due to their complexity and setup requirements. We've now implemented enough of these features that we're offering them as a new option - Premium Online Booking.

Premium Online Booking includes all the great features of our regular Online Booking as well as the following new options:
  • Full Tech Card Viewing - We now have support for showing your technical card information in the Employee Access section. As always, you can choose whether to allow this on an employee-by-employee basis as well as whether you want to turn this on for the salon or not. With this feature turned on the technical cards that show up on your work tickets will also show up when you click a customer's name on your schedule. You can also choose how many past cards you'd like to show, whether that's just the last card or as many as possible!
  • Time Card Access - We've also added the ability to have employees clock in and out through their mobile apps. Depending on the setup of your salon's internet and WiFi setup it could be possible to limit this to only be accessible when the device is connected to the salon's WiFi which means the employees could only use it to clock in when they were on site. If you're interested in this feature don't hesitate to contact us for help in determining if your network and internet can support the on-site only portion of this feature.
  • Custom Online Booking Links - Normally we set up a single customer booking and employee access link for each salon but sometimes that's not enough. Many times booth rent employees would like a link for just their customers to use. Sometimes a salon might want to have a separate online booking link for their mobile device users so that they can customize the appearance for smaller displays. Whatever the reason you need it, we now offer the ability to create additional online booking links that are customized for your needs! Each one of these links can have its own settings so you can have only certain employees show, only certain services, change the color scheme, or change any other settings in the online booking.
All of these features are available for an additional $25 / month - call us today to get started!

Thursday, July 14, 2016

EMV Chip Card Update

As I mentioned in a blog post last fall we had gotten our program ready to support the EMV chip credit card readers. We've been steering our customers away from them since the beginning since it was clear to us the industry wasn't ready when they tried to roll these out - it seems now that the industry has come to the same realization. The rest of this blog post is an update we just received from our partner that provides our credit card integration, OpenEdge.

New Post from OpenEdge


EMV Update

We value our partnership with you and strive to keep you informed related to significant updates across the payments landscape. You may have seen recent stories in the news regarding EMV chargeback policy changes. We’re contacting you to provide an update on how these changes affect you and your merchant customers, and what merchants can expect if they have not already upgraded their systems for chip card acceptance.

What’s the Latest on EMV?
The U.S. continues to see a slow rollout and implementation of EMV. We are now well beyond the start date of October 2015, and most merchants at this point realize there was no need to panic. In fact, only 17% of small to medium businesses using an integrated POS have upgraded to EMV.
The card brands have also taken a step back to evaluate the EMV rollout with both Visa and American Express recently modifying their chargeback policies for merchants who are not yet ready to accept chip cards. Those changes include a decision to block all US counterfeit fraud chargebacks under $25, effective July 22, 2016. According to their own research in the U.S., American Express discovered that 40% of counterfeit fraud chargebacks occur on transactions that are below the $25 threshold.

In addition, beginning October 2016, VISA and American Express issuers will be limited to charging back 10 fraudulent counterfeit transactions per merchant account, and will assume liability for all fraudulent transactions after the limit has been reached on an account. Both of these changes will remain in effect until April 2018. These changes to the EMV chargeback policies are designed to give merchants more time to upgrade their systems for chip cards while limiting merchant fraud losses.
Specific to the verticals that OpenEdge serves, we see low to moderate chargeback risk, with extremely low numbers of chargebacks reported. In fact, over the entire OpenEdge portfolio, only 0.005% of sales volume has been reported as EMV chargebacks.

What Does This Mean to Merchants?

This is good news for your customers. These changes give merchants more time to update their systems for EMV while reducing excessive chargebacks. Please note that there is no action required by your customers related to the updated EMV chargeback policies from Visa and American Express. The changes will be implemented automatically – no intervention is required.

Beyond the new chargeback policies, several of the card brands are also working on resolving another merchant EMV concern – the time it takes to approve a chip transaction. Visa and American Express are both working on technology to speed up transaction times. Visa has introduced Quick Chip for EMV which allows consumers to remove their card from payment terminals before the transaction amount is finalized or before the authorization response has been received.  American Express recently announced the launch of Quick Chip, a service designed to provide a quicker route to process chip card transactions.

Additionally, OpenEdge will continue to leverage our card network partnerships to provide technology that improves the performance and overall customer experience of EMV processing.
We look forward to continuing to serve you and your customers with secure integrated payment solutions.

Please contact us if you have any questions regarding the recent EMV chargeback policies or other topics impacting payment processing.

For more information: https://openedgepayments.com/emv/update.html

Thursday, September 17, 2015

Credit Card Updates and EMV

I'm sure the calls have started coming for many of you...salespeople claiming that your credit cards will stop processing soon or that you'll be facing liability on all transactions if you don't switch to their company's card processing. Unfortunately, the upcoming changes to credit card regulations have left the door open to people trying to exploit the uncertainty to make money. Hopefully this post will both set your mind at ease and give you a look at some of the new features that we've made available in our OpenEdge/Accelerated Payments (X-Charge) integration to get businesses ready for EMV and streamline your credit card processing.

To start, as OpenEdge explains in their EMV FAQ, " EMV is a chip technology used globally in place of magnetic stripe. EMV chip technology helps to reduce card fraud in a face-to-face card-present environment, provides global interoperability and enables safer and smarter transactions across contact and contactless channels." Basically, EMV allows more secure credit card transactions that require a card present that's nearly impossible to fake and therefore greatly reduces fraud.

To process EMV transactions you need to have a new EMV-capable credit card swiper. As OpenEdge mentions in the FAQ the liability shift for merchants begins in October 2015. However, this simply means that if a customer presents a credit card that has an EMV chip in it and you choose to swipe it instead of using the new EMV method of processing that any chargebacks would automatically be the business's responsibility instead of the credit card processor. That said, it's exceedingly difficult for a salon or spa to win a chargeback on a regular credit card transaction so the added costs of this liability may be very little compared to the current system. In addition, OpenEdge points out, "Currently, the card networks will be charging the same interchange rates for EMV and non-EMV transactions. OpenEdge has no control over network interchange rates or knowledge of changes in the future."

As it stands now you have a chance of additional liability on chargebacks in a situation where you would have won a dispute if you'd had an EMV reader and no extra charge per transaction whether you process with EMV or not. We leave the decision up to our customer's as to whether they want to use EMV terminals or not but each business should definitely discuss the costs of upgrading to EMV devices with OpenEdge and balance that cost again their comfort level with the added liability. You can read more about OpenEdge's handling of EMV at their EMV web site - don't hesitate to call us with any questions at 937-832-3969 with any questions.

In order to prepare our software for these changes we've made many changes under the hood with our credit card processing and a few changes that you'll notice with the flow of credit card transactions. Our first change - and one of the more important - occurred in our Maintenance area under Computer Info. We've removed the 'Path to Credit Card Software' box and replaced it with a much easier to use 'Credit Card Setup' button. This button will guide you through the setup of your credit card processing on that computer. Very important to note - especially for future versions of X-Charge that will mandate that you change passwords in X-Charge every 90 days - is the ability to set the UserName and Password for X-Charge within this section. This will be required once you've updated to make the X-Charge integration work correctly so everyone will need to set this up even if they're already processing with X-Charge through the program. In addition, the system will ask for your Processing Account (or MID). This is the name that you'll see in X-Charge when you go to Transaction and choose Processing Account. For most businesses already using X-Charge the system will automatically fill this in for you but for new customers or customers with multiple processing accounts for their independent contractors you'll need to get this information from X-Charge. We've tailored the questions in this section to your setup so as long as you have the MID, UserName, and Password for X-Charge the setup in this section should be quick and easy but as always, please contact support with any questions.

The next most noticeable change will be with the flow of processing a sale. In the past, when Spa/Salon Manager processed a credit card sale there was no interaction with X-Charge until you'd swiped the customer's card, printed their authorization receipt, had them sign it and write in their tip amount, entered the tip amount in our program, and clicked Continue. Due to the new PCI and EMV requirements we've moved away from this process. Now, as soon as you've clicked continue on the Check Out screen and the Credit Card form pops up you'll notice X-Charge process the transaction. If you have an EMV device, Pin Pad device, Signature Capture device, or any of the other devices X-Charge offers that interact with customers these devices will then take over the sale and collect their information. If it's just a standard credit card swipe sale X-Charge will prompt you on the screen to swipe the card. This represents a change to the current system but ensures that whatever device you're using X-Charge will be able to take care of the card for you. Once you pass this step you can print your authorization receipt. That receipt will now have added information from the original sale including authorization codes, EMV information, and all other pertinent information to the transaction. Finally, you can add your tip before hitting Continue, when the program will adjust the sale to include the tip.

We're very excited about these changes - they're cleaner and they insure that even if the final processing hits a snag you still get paid for the sale itself as opposed to before where if you handed the card back to the customer before the transaction was complete you ran the chance of having them walk out without paying, and they ensure that whatever changes come in the future with the devices X-Charge offers we'll be able to support them. The last change directly relates to EMV transactions. We'd hoped to offer EMV transactions without changing any functionality in the program but unfortunately the regulations on EMV with OpenEdge's processors does require a couple changes. Specifically, those processors do not allow EMV transactions to be adjusted which has a couple effects on our software. First, for any customers that choose to use EMV devices their sales will no longer run as a Purchase and then Adjustment. Instead they would run as what's called a Pre-Auth and then a Force. This means that one benefit we got from the new updates - the fact that if there's a problem with the final processing of the card you're still guaranteed to receive payment for the non-tip portion of the sales - goes away for customers using EMV. The second and larger issue is that since we're prevented from adjusting EMV transactions you would no longer be able to change the amount on a credit card payment through Correction. The only method for changing a payment on a credit card transaction for businesses using EMV terminals would be to Void the transaction, contact the customer for the card information, and then re-run the sale. Please keep these limitations in mind when weighing the pro's and con's of utilizing an EMV device.

Some of our Cloud customers are already running the new version of the credit card processing and we should have all Cloud customers on the new version by October. For our customers using the installed version that would like to prepare their software for EMV, please contact technical support to plan your upgrade.

Tuesday, June 16, 2015

Fixing App Access on a new iPhone

With many of our customers upgrading to the new iPhone 6 I felt it was important to provide some information on how to upgrade our App on your phone in case it doesn’t automatically work. I’ve included a guide below to help fix the Notification settings for our app on the iPhone and get back into your App. As always, don’t hesitate to contact support with any questions.


Monday, June 30, 2014

New Feature - Membership

In the past, businesses that wanted to charge an ongoing membership fee within Spa/Salon Manager needed to track those payments separately. With our release of the new Membership feature that’s all changed! Not only that, but we've rolled together several existing features in the software to make a very powerful Membership program allowing each business to create a customized Membership program that includes automated billing, discounts, and reports to track your valuable membership customers.
In order to use our new Membership feature you’ll first need to make sure you’re using our Integrated Credit Card Processing. By using X-Charge to process your credit cards within the system you can ‘vault’ your customer’s credit card information. This safely stores the information necessary to charge your customer’s card in the future without actually storing their card information on your computer. That way you get the best of both worlds – the flexibility to charge your customer’s recurring payments without the hassle and liability of storing their actual card information.
Once you have the Integrated Credit Card Processing in place you can move on to the simple setup of the Membership program. Before actually going to the Membership Settings though you’ll want to make a quick stop under Maintenance -> Loyalty -> Categorize Customers if you plan to have a special Customer Type in the program for your Membership customers. Setting a specific Customer Type for your Membership customers has many advantages – setting a service or retail discount for all sales right there on the Categorize Customers screen, marketing directly to those customers with our Mailing Reports and Email features, to even creating customized Discount Codes that can only be used by your Membership customers, creating a new Customer Type for your members makes your Membership program work for you.
Once you’re ready, go to Maintenance -> Loyalty -> Membership Settings and fill out the following information there…
  • Use Membership Settings: Checking this box turns on the Membership program and makes the rest of the options visible.
  • Default Payment Frequency: While each customer gives you the option to select how often their payment is due for many companies you’ll only have a single Membership program in place. In those cases this setting and the rest of the default settings saves time for each new membership customer.
  • Default Payment Amount: The amount (without tax) that you’ll charge for your primary membership program.
  • Default Customer Type: The membership program does far more than just charge the customer’s card each month! By selecting a customer type you can use the existing Discount Code and Customer Type features to create discounts targeted to just your membership customers.
  • Default Transaction Type: This ensures that you have a valid payment type to accept credit card payments in the system. Simply select the desired payment type from the list of valid types. If you have not yet set up a valid credit card payment you can do so under Maintenance -> Transaction.
  • Default Days for Expiration: Leave this set to 0 days for Membership programs that stay in place until the customer cancels them. If you’d like to have a Membership program with a set ending date you can fill in the number of days in this box to set the expiration. For example, if you fill in 365 in this box and then create a new Membership on 6/16/2014 the expiration date would come up as 6/16/2015.
  • Requires Service Tax/Retail Tax: Depending on your state laws Membership fees may be taxed as either services, retail, or both. Check the proper boxes for any taxes you’re required to collect.
There’s one more important piece of information to fill in before you start selling memberships to your customers. Since all of the bills after the initial payment will be charged automatically at night, you’ll want to have someone authorized to receive email feedback letting them know when the system declines a customer’s credit card, when their membership expires, and any other important information that happens while those cards automatically process. You can set this up under Maintenance -> Management Alerts. There are three types of alerts in the Membership Program section:
  • Membership Billing Declined Transactions: All of the employees you select under this option will get an email any time a customer’s card can’t be processed or their membership has expired.
  • Membership Billing Errors: This is a catch-all for anything that might go wrong during billing. For example, if the computer running the billing does not have credit card processing set up the employees selected in this option would receive a notification email.
  • Membership Billing Feedback: This sends a single email to each authorized employee once the billing finishes each night and lets them know how many customers the system attempted to process.
With those settings in place you’re ready to start using the Membership feature. Accessing the Membership feature is simple. We've added a new button to the Customer Display screen called Membership. Most of the boxes on that screen are the same ones we set the defaults for earlier in Membership Settings. That’s great news for your front desk staff since they won’t have to ever change any of those settings if you only have a single membership program! The screen will show a Start Date which will show today’s date for new customers or the date the customer entered the program for existing Membership customers. It will show a Next Billing Date which shows the next date after today’s initial payment a new customer would be billed or shows the next date that the system plans on billing existing customers. Existing Membership customers will also have a Last Date Billed which will show the last time the system successfully charged their card. Finally, the expiration date will show if you entered a default other than 0 days and the Service or Retail Tax will show along with a Total Payment for businesses that have to pay those taxes on Memberships. Also on this screen is the last 4 digits of the credit card on file as well as its expiration date. Don’t panic if you haven’t put one in yet – you’ll get the opportunity to do so when you click Continue to save all your settings. Simply fill in all of the information on the screen with the correct information for the Membership program the customer would like and you’re ready to move on to the next step. You can also Cancel a membership right from this screen with the click of one button and print out Membership Summaries for your customers that will let them see their Membership settings and billing history, either with a printed copy or an email sent directly from the program.
After hitting Continue the system will ask you to vault a credit card if the customer did not already have a card vaulted. Simply swipe the card or key in the information and click Ok to keep going. Next the program will ask you whether to use the stored credit card for this transaction. Click Yes and you’ll come to your familiar Credit Card Processing screen. The Card Number and Expiration Date will already be filled in – no need to swipe the card again. You can click Authorization Receipt to print a copy of the receipt that includes a Membership Agreement for the customer to sign. Finally, when you click Continue on the Credit Card Processing screen you’ll get a receipt for the customer that also includes their Membership Agreement.
Once a customer has signed up for a Membership their card will automatically get charged as each new payment date comes up. The Management Alerts you set up earlier will let your managers know if someone’s card couldn't be charged or if their membership has expired so that you can quickly handle any problems with billing. Changing a credit card on file is as simple as clicking on the credit card information on that customer’s Membership Screen, so even when a credit card expires it’s a quick fix to get the customer set back up for recurring billing.
To pull all the new information together we've added two new reports to Reports -> Owner Reports -> Date Range Reports. The Membership Transaction Log gives a listing of all billing activity during the dates that you enter. The Membership Billing List gives you a list of customers, broken down by whether they’re Active (still getting billed regularly) or Inactive (not getting billed anymore due to a failed payment or expiring membership) and sorted by their Next Billing Date. This report gives you a glimpse of how much money you’ll likely bring in from your Memberships over any time frame as well as how much money you stand to lose if you don’t convert your Inactive memberships back to Active status. The Membership Transaction Log will be especially important in reconciling your Spa/Salon sales to the X-Charge information because Membership transactions are a special type of sale that will not show on the Detailed Daily Sheet. The Transaction Log for the current day can also be viewed directly in the program through Correction -> Membership Transactions to allow quick access to customers who had cards processed that day. The Membership Billing List can also be viewed through the Memberships button at the top of the screen and will allow you to see all memberships that have their next billing dates between certain dates, that are part of certain customer types, or that are Active/Inactive.
One last thought on the Membership program – while we've created a powerful system that uses the various tools in the Spa/Salon Manager to create compelling Membership programs for your customers, at its heart the Membership program is a recurring billing system. This system has applications beyond our Membership system. For example, booth rental salons that charge their employees a rental fee could use the Membership program to set up those booth rental charges. Schools could set up the system to charge tuition. Fitness clubs could use the system to charge a monthly fee just to be a customer. Basically, the Membership program is powerful but it’s also flexible enough to meet any recurring billing needs.
As we’ve alluded to throughout this article, the power of the Membership program comes from using the existing features of the program like Customer Types, Discount Codes, Mailing Reports, and Email to extend what Membership means to your customers. As always, please contact Technical Support with any questions. We’d be happy to help you find ways to use The Spa/Salon Manager to meet your Membership Program needs!

Thursday, February 27, 2014

Important Information on Windows XP

As hard as it is to believe, Windows XP has been with us for 12 years now! Unfortunately, after supporting XP for all those years and releasing many new versions of Windows, Microsoft will be discontinuing support for XP. So what does that mean for our customers using Windows XP still?

First, if you're not sure which version of Windows you're using you can follow Microsoft's guide to finding your operating system. If you have any questions, don't hesitate to contact us!

Even though the end of support for Windows XP is on April 8th, 2014 there isn't anything that will change immediately with your computer. Microsoft has a great article that explains the risks associated with remaining on XP - the primary points for our customers are the following:
Security:
Without critical Windows XP security updates, your PC may become vulnerable to harmful viruses, spyware, and other malicious software which can steal or damage your business data and information. Anti-virus software will also not be able to fully protect you once Windows XP itself is unsupported.
Compliance:
Businesses that are governed by regulatory obligations such as HIPAA may find that they are no longer able to satisfy compliance requirements. More information on HHS’s view on the security requirements for information systems that contain electronic protected health information (e-PHI) can be found here (HHS HIPAA FAQ - Security Rule).
This is an important issue that our customers should take very seriously - especially those that use credit card processing that runs through our program. That said, your computer will not shut down on April 8th. You'll be far more vulnerable to viruses and attacks but as long as you don't get attacked our program will continue to run. We will continue to support customers using XP on their systems for as long as we can keep the program running on them.

For customers that are not ready to switch their computers off of Windows XP by April 8th, the Cloud version of our software can decrease your risks. By switching to Cloud you no longer have to worry about your program's data sitting on your computer. Instead, we would have your information safely stored on our Cloud servers and as a worst-case scenario while your computer could be compromised, your Spa/Salon Manager software would not. In addition, changing to Cloud makes it far easier to switch computers in the future. You can read more about the Cloud version of our software in our Cloud-related blog posts and as always, please contact us with any questions.

Wednesday, January 15, 2014

New Feature - Check SpaSalon Email

As a service to all of our Cloud customers and all installed customers with current contracts we offer a free email address. We also offer many ways to check the replies to those emails - using the built-in email on your smartphones, Outlook, automatic forwarding to another address, and even our own web interface called WorldClient. We still needed one last part though - direct access to those emails within the SpaSalon Manager program. With the new Check SpaSalon Email button we've added that access by integrating the easy to use WorldClient web site into our software!

For any customers that don't have their SpaSalon email directly forwarded to another email address all you need to do is update your program. The update is already there for our Cloud customers. Once you're on the newest version of SpaSalon you can go to your Send Email button at the top of the screen and chose the Check SpaSalon Email option in the bottom-left of the screen. The program will launch a built-in web browser which will take you directly to WorldClient and immediately log you in. Once there you will have full access to WorldClient just as if you had logged in through the web.

There are some limitations on what you can do - for safety we've disabled any external links within the emails. Other than that though you'll have full access to read the replies from customers, send replies back to them, and handle anything that you used to do through WorldClient.

For customers that do have their email forwarded already but would like to use this feature just contact technical support and we'd be happy to help set you up with either WorldClient only or using both the forwarding of emails and WorldClient.

Friday, August 30, 2013

Preparing for Online Booking

If you're thinking about using online booking you should read my earlier blog post on the benefits of online booking and employee access. Once you've made up your mind to start booking online these simple steps listed below will prepare you for a smooth transition to our Online Booking.

There are a couple of pieces of information that are critical for the Online Booking to work - your working hours and the booking styles. If you think about what Online Booking does it makes sense - when someone calls the salon to book an appointment you've got a live person answering the phone. Even if you haven't set up your hours, service list, and timings correctly the receptionist may catch those mistakes and correct them. When you're booking online the computer makes the decisions though so you need to give it the right information about how and when to book appointments.

You'll want to set up Working Hours first. Go to the Appointment Book, then the Appointment Setup button at the bottom of the screen, and then click Working Hours. Go through each employee and make sure that all the employees have the correct working hours. In addition, you should set up any times where an employee is out during their regularly scheduled hours or working during hours they are not normally scheduled - either by booking the times out with appointments or through Appointment Setup then Schedule Maintenance.

Once you have set up your Working Hours you should make sure that our Booking Styles are correct. Booking Styles are accessible through the Appointment Book -> Appointment Setup -> Booking Styles.

To set up the timings for single services you can go to the Booking Styles button on that screen. Make sure that each employee has the correct timings for all the services that they do. In addition, if there are any services they don't do you'll need to go to those as well, click the box on the screen that says Employee Does Not Perform This Service until it turns red, and click Continue.

If you have any combinations of services that need special timings you can go to the Combination Styles button to enter those timings. Finally, if you have any customers that need special timings you can set that up through the Appointment Book -> Appointment Setup -> Special Customers.

Our last area of the program to set up for Online Booking is Service Maintenance. Go to Maintenance -> Service -> Modify Service and go through each service one at a time. There are two spots on the screen you'll want to check.

First, near the top of the screen there is an Allow Online check box. You may not want some of the services listed online, whether they're services for which you want to talk to the customer first or simply housekeeping services like 'Free Haircut/Redo' or 'No Show'. This step gives you the opportunity to present a clean, concise list of just the services you want your customers to see.

Right beside that box on the same screen there's an Online Description. This optional set allows you to enter a short description for the service. You can fill it in on just the services you'd like and use it to give more information about each service. It's very useful for providing special instructions or for marketing your services.

Once you have the program ready and we've turned on your Online Booking you'll want to contact your web developer to add a link to your website. If we developed and host your web site then you're all set - we'll handle everything for you! Otherwise we can work together with your web developer to not just give them a link but make the Online Booking a seamless part of your existing website.

By taking the time to go through these few simple steps as soon as you make up your mind to move forward with Online Booking you can have fully functional, accurate, and always available Online Booking functionality added to your web site very quickly, often within a day! As always, don't hesitate to contact us with any questions.

Monday, May 6, 2013

Family Checkout

We've just finished a wonderful upgrade to the Family Checkout process and I wanted to take some time to explain the changes and the feature in general.

Before anyone panics, there's nothing to relearn after the upgrade. We've kept the steps the same as they've always been but added some helpful messages to the checkout screen as well as made it possible to see the Previous Customer Total and the Balance Due at the same time. It's still the same easy process you've been using - we've just added more information to help new users know what to do at each step along the way.

The first step in using Family Checkout is checking in all the customers that will be a part of the sale. You can do that from the appointment book by clicking on the appointment and clicking Check In on the following screen or by using the Check In menu button  at the top of the screen. Make sure to check in all the customers that are paying together first.

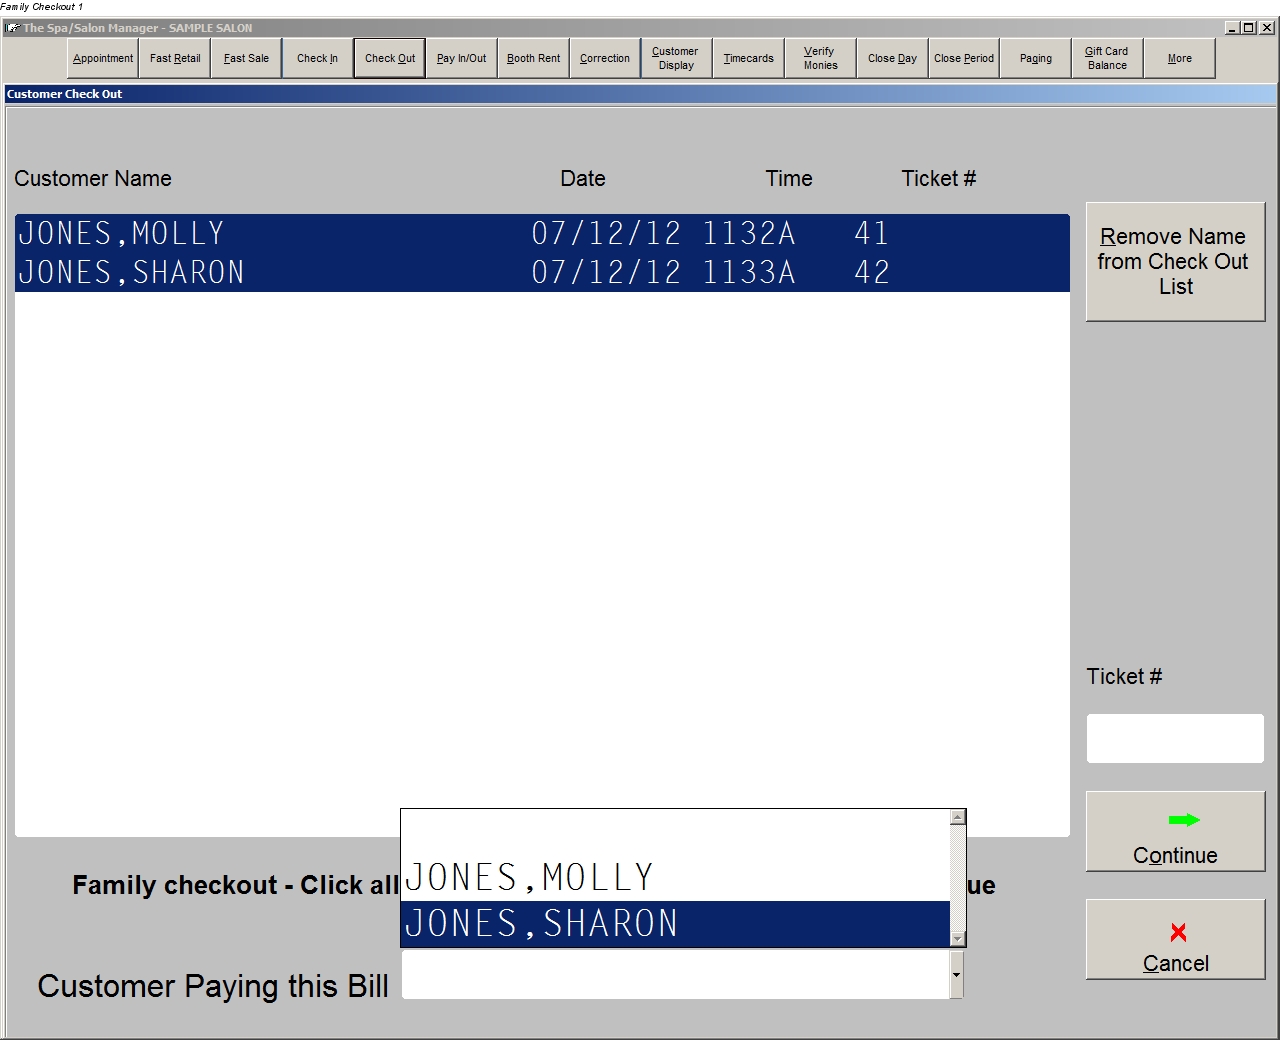
Next, go to the Check Out menu button at the top of the screen. This comes up with a list of currently checked in customers which will include all the customers you just checked in. Click all the names that are checking out together - the program will highlight all the customers. Once you've selected at least two customers you'll notice that the bottom of the screen shows a new box - Customer Paying this Bill. Once you've selected all the customers for this ticket you can pick one of those customers from that list as the person that will pay for the bill. That customer will be the last one checked out and their total will show the total from all the other sales as well as their own. Once you've selected the customer paying the bill, click Continue to move on to the next step.


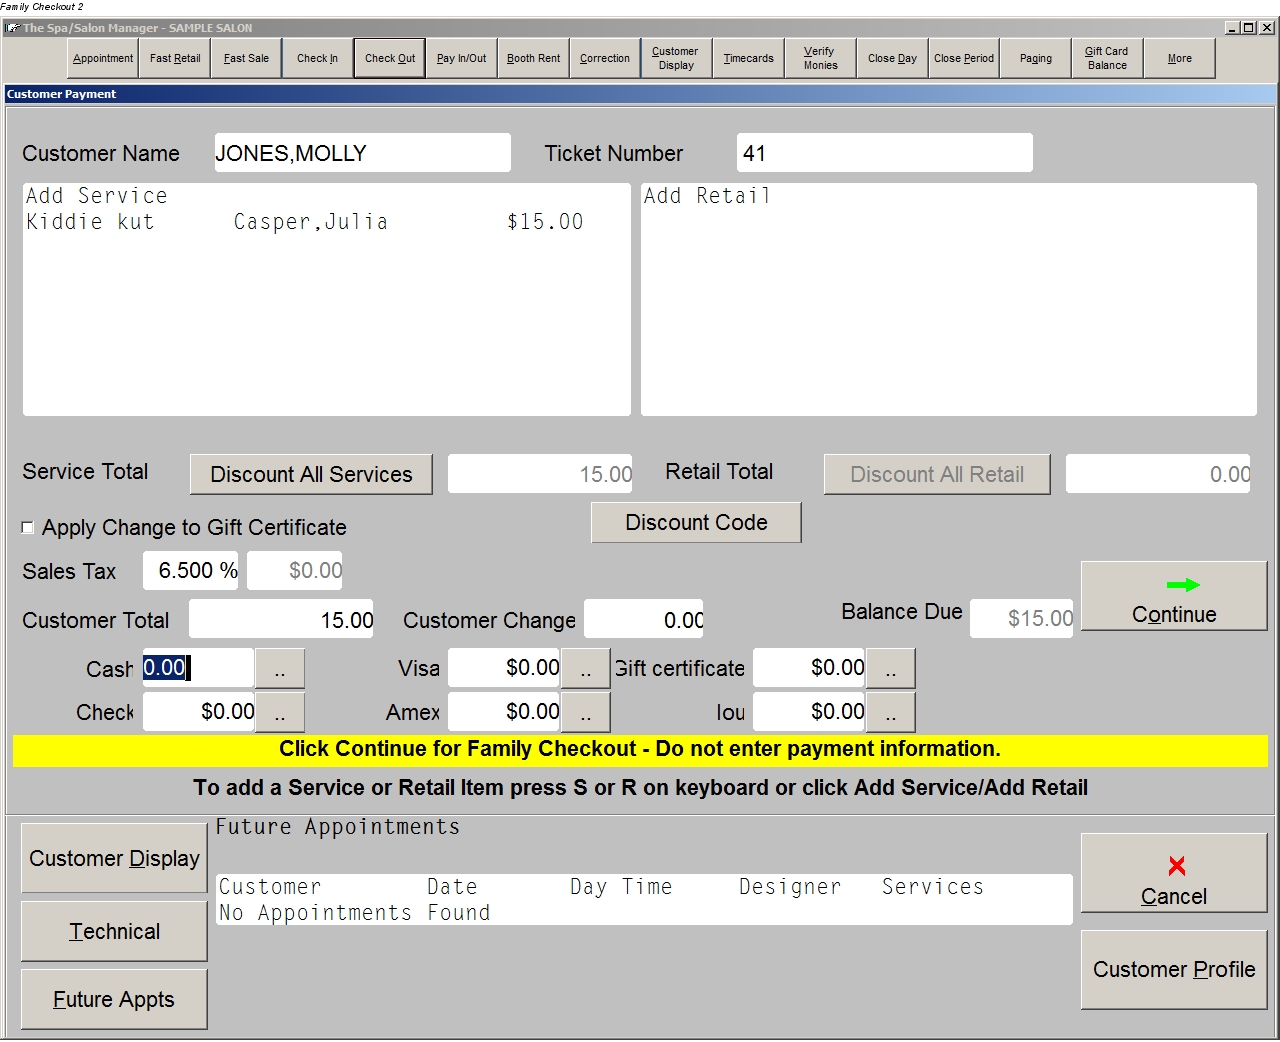
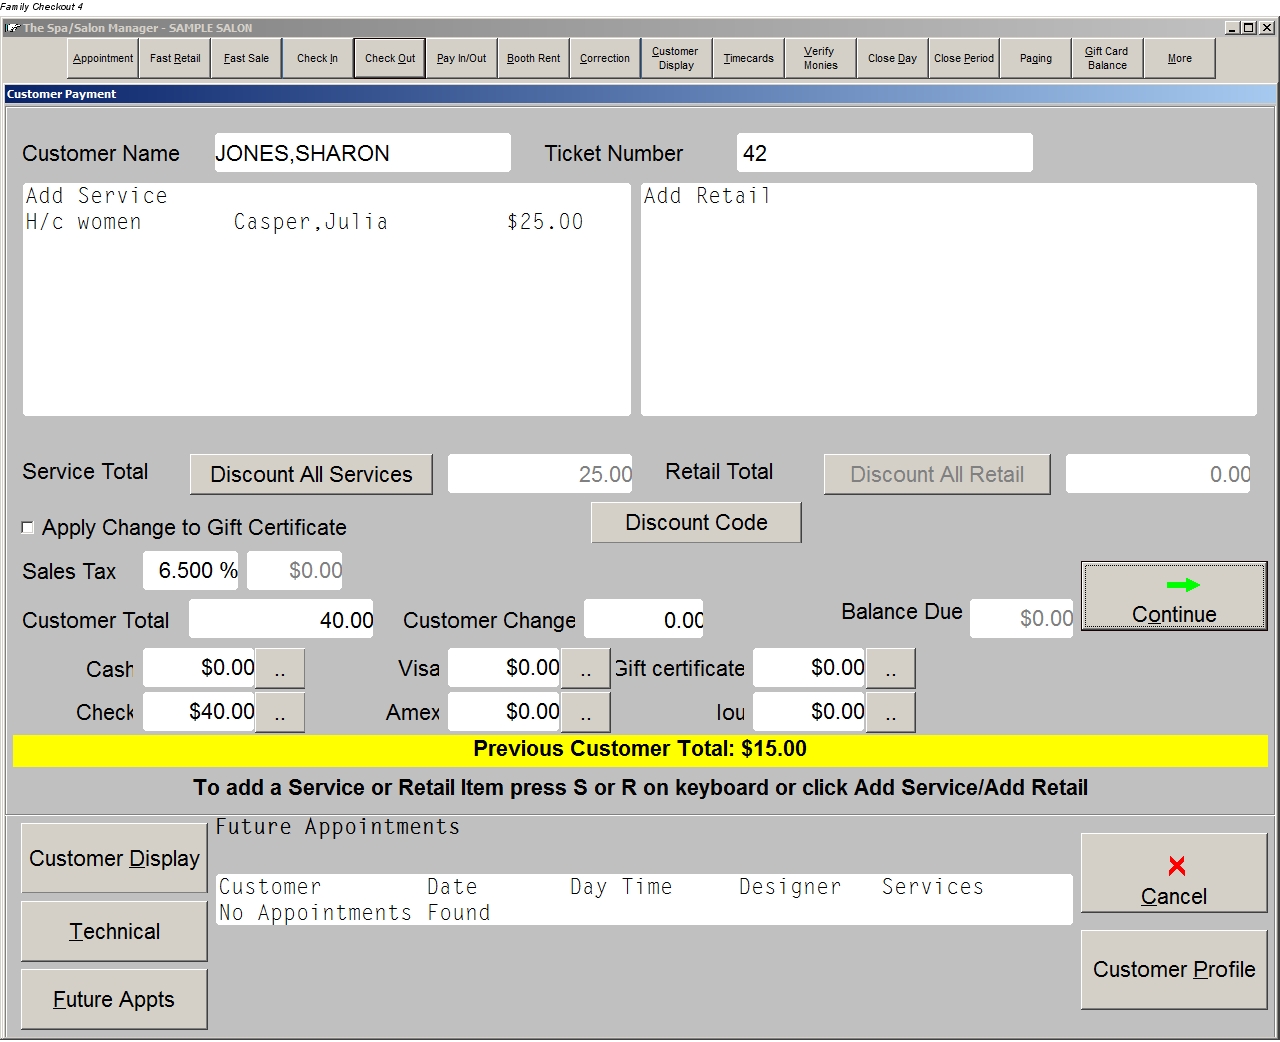
After this step, you'll have a typical checkout screen for the first customer. The only difference is a message that shows in yellow beneath the payment lines: "Click Continue for Family Checkout - Do not enter payment information". Fill in everything as you would normally - services, retail items, discount codes, etc. Once you have the correct information entered for that customer, hit Continue without entering a payment. The program will ask you if someone will be paying the bill later - answer Yes to this question. This will take you to the next customer - just repeat these steps for every customer until you get to the last customer - the one we selected earlier as paying the bill.


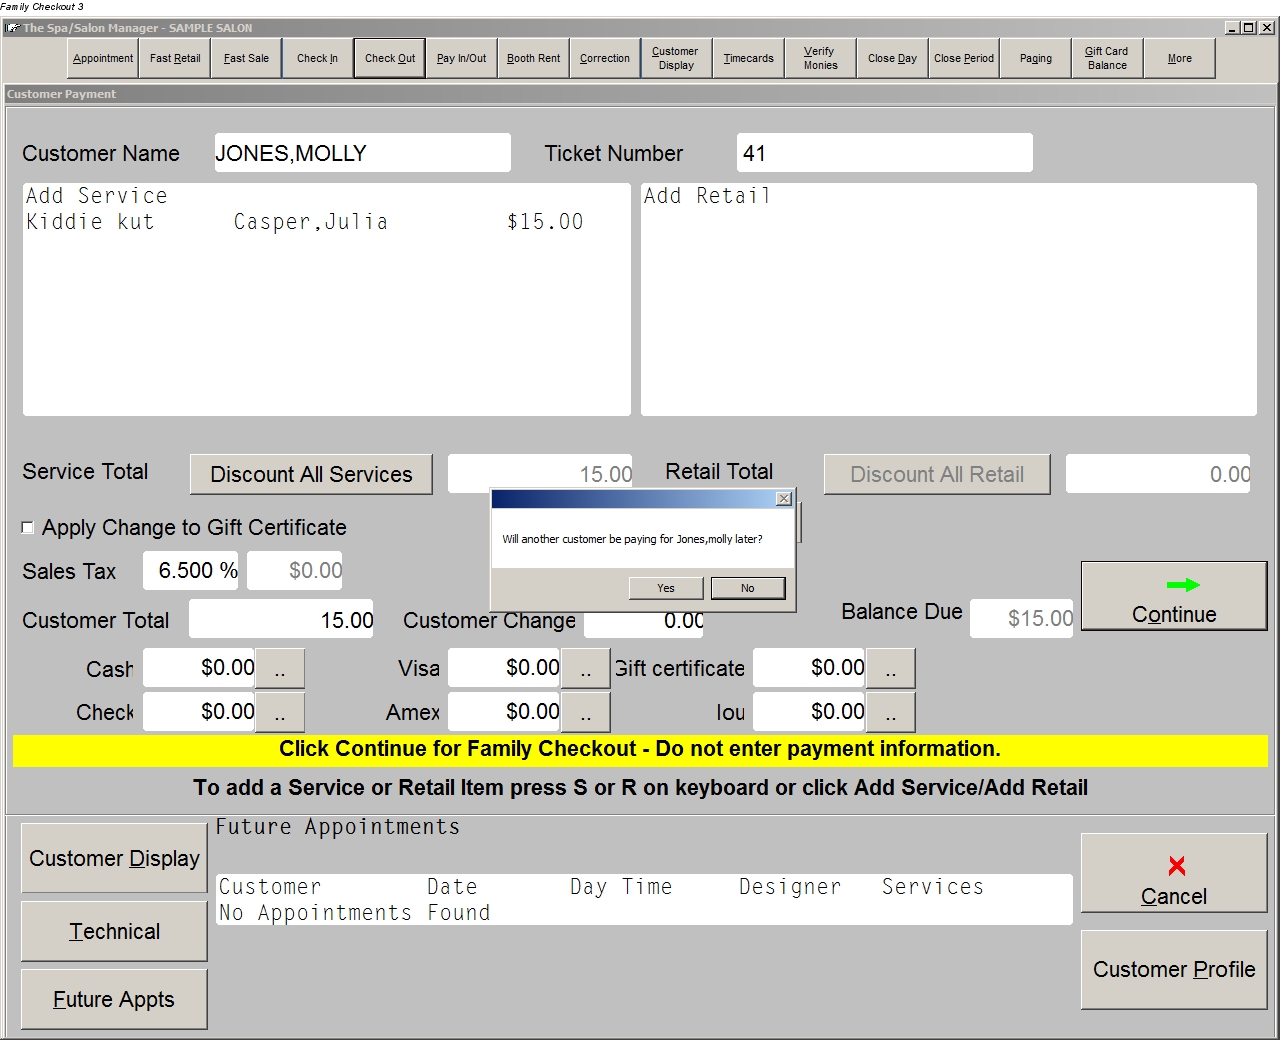
When you get to the last customer you'll see a new message in yellow beneath the payment lines: "Previous Customer Total: $XXX.XX". This message shows the amount that's carried forward from all the other customers. Fill in everything as you would normally again - services, retail items, discount codes, etc. You'll notice then that the Customer Total reflects the Service and Retail totals from this customer as well as the Previous Customer Total shown in yellow. At that point, enter the correct payment and click Continue. You're done with the Family Checkout!


On the bookkeeping end of things, all the customers that did not pay the bill will show up as paying with cash. The customer that paid the bill will show up as getting change in an amount that covers the rest of those sales. This reflects what actually happen - one customer paid over the amount for their bill, received change, and used that change to pay for other customers.

Family Checkout remains a powerful tool to speed up the checkout process for families, wedding parties, or any other type of group. Cloud customers already have the new features from Family Checkout and non-Cloud customers can do a Web Update to get the most recent version of the program. As always, please contact support with any questions.

Thursday, January 3, 2013

Loyalty Program

We’ve had a loyalty program in The Spa/Salon Manager for a few years now but I took some time at the end of the year this year to improve it, make it easier to set up, and easier to use. Given these changes I wanted to take a moment to explain how the Loyalty program works.

We’ve designed the Loyalty program with simplicity in mind. You’ll start by going to Maintenance -> Loyalty -> Loyalty Program Settings. On this screen you can choose some basic settings that will govern how your customers accumulate points. We provide separate lines for Service Dollars per Point, Retail Dollars per Point, and Gift Certificate Dollars per Point. If you set those boxes to $20, $10, and $50 respectively then customers would receive one point for every $20 of service sales, $10 of retail sales, and $50 of gift certificate purchases. The system assigns points down to the penny so in our example every $0.20 of service sales would give 0.01 points. In addition to these three settings you can assign bonus amounts to each day of the week for the three numbers. Extending our earlier example we could click the Thu box on the Service Dollars per Point line and put in 10 for the percent bonus. Then instead of getting 1 point for every $20 spent the customer would get 1.1 points on Thursdays – a 10% bonus.

Most salons can ignore the Location line (this only applies to stores that are running centralized gift certificates through us for multiple locations). The last part you need to set up is the method for assigning Loyalty ID’s. If you don’t use the Loyalty program yet we show No Loyalty Program here. Your other two options are to Assign Loyalty ID Manually at Check In or to Automatically Assign Loyalty ID at Check In. If you have loyalty cards that you’ll be giving to the customers (like our plastic gift cards we offer) then you’ll want to choose the Assign Loyalty ID Manually at Check In option. If you’d like to have the program manage the ID numbers for you then you’ll choose the Automatically Assign Loyalty ID at Check In option.

Once you finish on the Loyalty Settings screen the program will automatically add the Transaction Type and Pay In/Out category of Loyalty for you. If you’re out of space and don’t have Loyalty in the system yet the program will warn you and tell you to contact support for help in adding the category. It’s critical that you get the Loyalty option added – customers will use Loyalty as their payment method when using their accumulated points to pay for part or all of a sale.

Our Loyalty program is an ‘opt-in’ program. This means that until you assign an ID# on the Customer Display/Check In screen the customer does not accumulate points. Once you’ve assigned an ID# customers will start accumulating points and you’ll be able to see their current point balance at the bottom of the Check Out screen near the Continue button. It’s up to each salon to decide when you want to allow customers to use their accumulated points. The program will allow you to use them when you’re entering a payment on the Check Out screen but each salon could train their staff to put in policies such as requiring at least $10 worth of points used, only allowing Loyalty as a payment for retail purchases, or any other restrictions the salon wanted to place on these redemptions.

We’ve designed the Loyalty program with simplicity and flexibility in mind. We hope that these few simple options will allow a variety of discount programs for our salons. If you have any questions with how to make our Loyalty program work for you, don’t hesitate to contact our tech support department.

New Feature - Stored Reports

Did your printer run out of paper? Did you forget to print a report? Or did you just want another copy of a report later but not want to wait for the program to create the report again? Our new Stored Reports feature does all that and more!

Owners can access the Stored Reports button under the Reports section. It’s a new button on the left where we list the different types of reports (Receptionist Reports, Manager Reports, etc). Once you’ve updated your system to a version of the program with Stored Reports we will store any Mailing Reports you pull up from that point forward for quick access later. We automatically keep the last 90 days worth of these Mailing Reports. Better yet, you can select any of those reports and click the Save Report Permanently option to keep it even after the 90 days are up.

In the future, I’ll be adding even more reports to this section as well as looking for ways to have certain reports get stored automatically at night, but for now I hope everyone enjoys this new feature!

Wednesday, December 5, 2012

Online Gift Card Sales

As I wrote back in June, the Spa/Salon Manager program makes it easy to sell gift certificates to your customers without dealing with the per-transaction fees that banks and credit card processors charge to load and redeem their gift cards. We have extended that same ability to your website allowing your customers to print beautiful gift certificates directly from the web. Best of all your employees don't have to handle the checkout process or the shipping!

To make all of this work you'll need a few services in place first. Online gift certificate sales are part of our Online Booking service so you'll need Online Booking to start selling gift certificates online. You'll also need a shopping cart account from CartManager - we'll help you get signed up for an account with them, get everything set up correctly, and you're ready to go. Finally, you'll need a way to process the payments that come in to CartManager - Accelerated Payments/X-Charge is a great choice that also integrates with the Spa/Salon Manager point of sale features.

Once you're set up with these three pieces in place we'll work with you to prepare custom artwork for your printable gift certificate. It's even possible to use more than one gift certificate picture which allows you to switch up your artwork with the seasons or with special offers that come up. A good web developer will be able to design a site for you that includes different gift card packages with different artwork for the cards or you can have us make your web site for you.

We also offer the ability to sell discounted or bulk gift cards. You could set up a sale of five $20 gift cards for $80. You could offer a free $20 gift card with the purchase of a $100 gift card. The system is flexible enough where you just decide a final bill amount and a face value for each gift certificate and your web developer can easily make that special available to your customers.

Call us today to get started with Online Gift Card Sales.

Monday, October 29, 2012

Getting More with Less Paper

Our owner Kent's wait for his new electric car got me thinking about ways you can use features in our program to cut your paper use, help the environment, and at the same time make it easier to use the program. We have a lot of features that help reduce paper usage - I'd like to cover some of them here.

We have many salons that print a Close Day Summary every day. You can print these reports at any time though - there's no need to print the report for a paper record. Also, our Cloud owners could get access to the report from their home computer any time from any of their connected devices. While it's just one piece of paper a day it's one piece that a lot of salons end up throwing away once they print it.

Printing work tickets takes a lot of paper. Some salons will want to continue printing these as they do provide valuable information. However, it's possible to work around the need for these work tickets - especially if you have extra computers on the floor for staff to use. Rather than using the work tickets to look up customer history, employees could use an extra computer on the floor to look up information as they need it. In addition, the Pre-Price feature allows service providers to enter any add-on services or pricing changes from a walk-up computer instead of writing them in on the work tickets. It saves paper and prevents mistakes at the front desk.

Printing schedules takes up a lot of paper as well. We offer a few ways you can do without paper schedules. First, walk-up stations allow employees to see their appointments - including new changes that a printed schedule could miss - without paper and without walking to the front desk. In addition, the Paging feature of the program allows employees with text-capable phones to receive notifications for any schedule updates. Finally, both the Cloud and Online Booking features allow employees with smart phones to see their schedule directly on their phones. These options are far more powerful than a printed schedule and give another opportunity to cut your paper use.

Lastly, the powerful Send Email feature in our program can help you cut both costs and paper usage by replacing some of your print advertisements with email marketing. You can easily send out your email marketing to all customers with email addresses and then target your print marketing to only go to people you couldn't reach by email.

These are just a few ideas off the top of my head for reducing paper usage with the program. There's so much you can do now without using paper. Between our Online Booking, our Cloud program, and the Paging feature you can extend access to the program to a variety of devices which will reduce your reliance on printing. You'll save money and in a small way help the environment as well.

Friday, September 28, 2012

SpaSalon Manager - Now on Facebook!

Ever since we rolled out our new website back in May we've been looking to put more and more information about our program and our company where our customers can see it.  We want you to get to know us as well as how the program operates. That entire time we've worked hard on something behind the scenes and I'm very happy to announce that we're now ready to unveil our company site on Facebook!

When we first discussed creating a Facebook page we were hesitant. We have so much great content on our new web site that there were questions about whether we could create something for Facebook that could add anything to what we already had. Once we got started though the answer became clear - we had a lot to say that didn't lend itself well to showing on a traditional web page.

Our Timeline page allowed us to tell the story of our company in a way that a simple web page could not. You can see the story of our company from its founding in 1985 to the present day illustrated in pictures. We have our newsletters, pictures of manuals and other materials from the early days of the business, as well as pictures of our employees and business owners that worked with us at our trade shows. They work together to tell a complete story of our business as it grew from Kent Crabtree writing a program for his parent's salon in 1985 to the business it is today.

Our Home Page section pulls together parts of our current web page like the blogs, the sign-up for a free trial, and links to our support and sales pages. This should make it easier for everyone to find exactly what they need. In addition there is a Training Videos section there where we give the same type of step-by-step support we offer over the phone to everyone on Facebook. Our growing list of videos give simple instructions that both teach new users how to use the program as well as show what each part of the program can do for you.

I hope you enjoy our new Facebook page! Give it a look, Like us, and feel free to leave comments! I'll personally be very active on the site and look forward to hearing from you there.

Last minute addition: We now have a business twitter account, @spasalonmanager. Feel free to contact us there!

Friday, September 7, 2012

New Email Feature - Email Footer

The Send Email feature of our program has always allowed you to send links and pictures. With a bit of work outside the program first you could even send full web pages. What the program lacked though was a way to automatically include certain links and pictures on every email that you send out. That's why we've added our newest feature to email - the Email Footer.

The Email Footer page, which is available under Maintenance -> Internet Marketing, makes it easy to create an attractive email footer. First, we've given you space to type in a slogan, extra information, current specials - whatever text you'd like to add to every outgoing email. Next, we've pulled together a custom set of logos for various social media sites - Facebook, Twitter, Google+, Pinterest, Yelp, and LinkedIn - as well as logos for your Home Page and Online Booking. These logos are all sized so they can fit together on a single line and link to any of these sites that you use. You enter the address for each desired site and the Spa/Salon Manager takes care of the rest. Finally, we added space for up to three text-based links. These could be links to other partner businesses, your own newsletters hosted on the web, or any other links you'd like included at the end of every email.

With just a few minutes of setup you'll be sending attractive emails that tie your social media presence directly to your emails as well as providing more options and information to your customers. Best of all, this is another free service included to all Cloud and Maintenance Contract customers! As always if you have any questions don't hesitate to contact support.

Thursday, August 30, 2012

Aveda Master Spreadsheet

Filling out paperwork takes up a lot of time for most businesses. There are tax forms, employee reviews, accounting information, as well as information required by various partners and distributors. We're always looking for ways we can save our customers time in that area. That's why we're very excited to unveil the Aveda Master Report.

We created the Aveda Master Report to make filling out this important information for Aveda much easier. In the past getting the information on this report required several different reports from our program as well as several different time frames for each one. It also required manually entering this information into Aveda's spreadsheet. With the new Aveda Master Report you just need to select your dates (Aveda requires a full year, 1/1-12/31), click Continue, and wait for the program to generate the data for the Aveda Master spreadsheet. When it's finished generating the data the program will pop up instructions for getting the results to the Aveda Master spreadsheet. Basically this just involves opening the Aveda Master spreadsheet, selecting the Paste Here tab at the start, clicking on the first cell (A1), and clicking Paste. Once you paste the information the Aveda Master spreadsheet will automatically fill in all the information on the DATA Entry Page.

If you don't have the Aveda Master spreadsheet available when generating the report our non-Cloud customers can use the file c:\salon\aveda0.xls on their main computer to do the same steps. Our Cloud customers can email themselves a copy of the file from the Send button under Customer Display by choosing Attach File and selecting aveda0.xls from the file list.

Whatever steps you use, our new Aveda Master Report will save you a ton of time! As always, don't hesitate to contact support with any questions.

Tuesday, August 21, 2012

New Cloud Feature - Taskbar Replacement

Our Cloud software has been very popular but many of our existing customers that recently converted to Cloud brought up an important question - How do we switch windows like we could with the installed version? Unfortunately the Cloud version of our program removed the Windows taskbar that allowed users to switch between open windows. We made changes to make it easier to use the program without that option but the frequency of that question lately made it clear we needed to make a change.

So we pushed up our sleeves, got to work, and created something that in many ways will work out better for our Cloud customers than the old Windows taskbar. Our taskbar replacement targets the specific main windows we feel are the most critical to our program - the main screen, Appointment, Appointment Detail, Check In/Customer Display, Check Out, Customer Payment, Verify Monies, Close Period, Paging, Inventory, Salon Use, Reports, and Maintenance. A few important that users can't minimize such as Close Day were left off of the list but we feel that the above list will allow users the flexibility they had to switch back and forth between the various windows in our program without having that list cluttered with all the extra windows that the Windows taskbar added. As an added bonus the tabs on the taskbar will always show in the order I listed above regardless of what order you open them in. This makes it easier to find the window you need and to quickly switch between all open windows.

We will be updating all our Cloud servers over the course of the next week or so with this great new feature. Please contact us with any questions or problems. This option will also be available to our customers that are using their own in-house servers - simply give us a call and we'll be happy to help you set this up for your own server.