If you're thinking about using online booking you should read my earlier blog post on the benefits of online booking and employee access.
Once you've made up your mind to start booking online these simple
steps listed below will prepare you for a smooth transition to our
Online Booking.
There are a couple of pieces of information that
are critical for the Online Booking to work - your working hours and the
booking styles. If you think about what Online Booking does it makes
sense - when someone calls the salon to book an appointment you've got a
live person answering the phone. Even if you haven't set up your hours,
service list, and timings correctly the receptionist may catch those
mistakes and correct them. When you're booking online the computer makes
the decisions though so you need to give it the right information about
how and when to book appointments.
You'll want to set up Working
Hours first. Go to the Appointment Book, then the Appointment Setup
button at the bottom of the screen, and then click Working Hours. Go
through each employee and make sure that all the employees have the
correct working hours. In addition, you should set up any times where an
employee is out during their regularly scheduled hours or working
during hours they are not normally scheduled - either by booking the
times out with appointments or through Appointment Setup then Schedule
Maintenance.
Once you have set up your Working Hours you should
make sure that our Booking Styles are correct. Booking Styles are
accessible through the Appointment Book -> Appointment Setup ->
Booking Styles.
To set up the timings for single services you can
go to the Booking Styles button on that screen. Make sure that each
employee has the correct timings for all the services that they do. In
addition, if there are any services they don't do you'll need to go to
those as well, click the box on the screen that says Employee Does Not
Perform This Service until it turns red, and click Continue.
If you have
any combinations of services that need special timings you can go to
the Combination Styles button to enter those timings. Finally, if you
have any customers that need special timings you can set that up through
the Appointment Book -> Appointment Setup -> Special Customers.
Our
last area of the program to set up for Online Booking is Service
Maintenance. Go to Maintenance -> Service -> Modify Service and go
through each service one at a time. There are two spots on the screen
you'll want to check.
First, near the top of the screen there is an
Allow Online check box. You may not want some of the services listed
online, whether they're services for which you want to talk to the
customer first or simply housekeeping services like 'Free Haircut/Redo'
or 'No Show'. This step gives you the opportunity to present a clean,
concise list of just the services you want your customers to see.
Right
beside that box on the same screen there's an Online Description. This
optional set allows you to enter a short description for the service.
You can fill it in on just the services you'd like and use it to give
more information about each service. It's very useful for providing
special instructions or for marketing your services.
Once you have
the program ready and we've turned on your Online Booking you'll want
to contact your web developer to add a link to your website. If we developed and host your web site
then you're all set - we'll handle everything for you! Otherwise we can
work together with your web developer to not just give them a link but
make the Online Booking a seamless part of your existing website.
By
taking the time to go through these few simple steps as soon as you
make up your mind to move forward with Online Booking you can have fully
functional, accurate, and always available Online Booking functionality
added to your web site very quickly, often within a day! As always,
don't hesitate to contact us with any questions.
Friday, August 30, 2013

Monday, May 6, 2013
Family Checkout
We've just finished a wonderful upgrade to the Family Checkout
process and I wanted to take some time to explain the changes and the
feature in general.
Before anyone panics, there's nothing to relearn after the upgrade. We've kept the steps the same as they've always been but added some helpful messages to the checkout screen as well as made it possible to see the Previous Customer Total and the Balance Due at the same time. It's still the same easy process you've been using - we've just added more information to help new users know what to do at each step along the way.
The first step in using Family Checkout is checking in all the customers that will be a part of the sale. You can do that from the appointment book by clicking on the appointment and clicking Check In on the following screen or by using the Check In menu button at the top of the screen. Make sure to check in all the customers that are paying together first.
Next, go to the Check Out menu button at the top of the screen. This comes up with a list of currently checked in customers which will include all the customers you just checked in. Click all the names that are checking out together - the program will highlight all the customers. Once you've selected at least two customers you'll notice that the bottom of the screen shows a new box - Customer Paying this Bill. Once you've selected all the customers for this ticket you can pick one of those customers from that list as the person that will pay for the bill. That customer will be the last one checked out and their total will show the total from all the other sales as well as their own. Once you've selected the customer paying the bill, click Continue to move on to the next step.
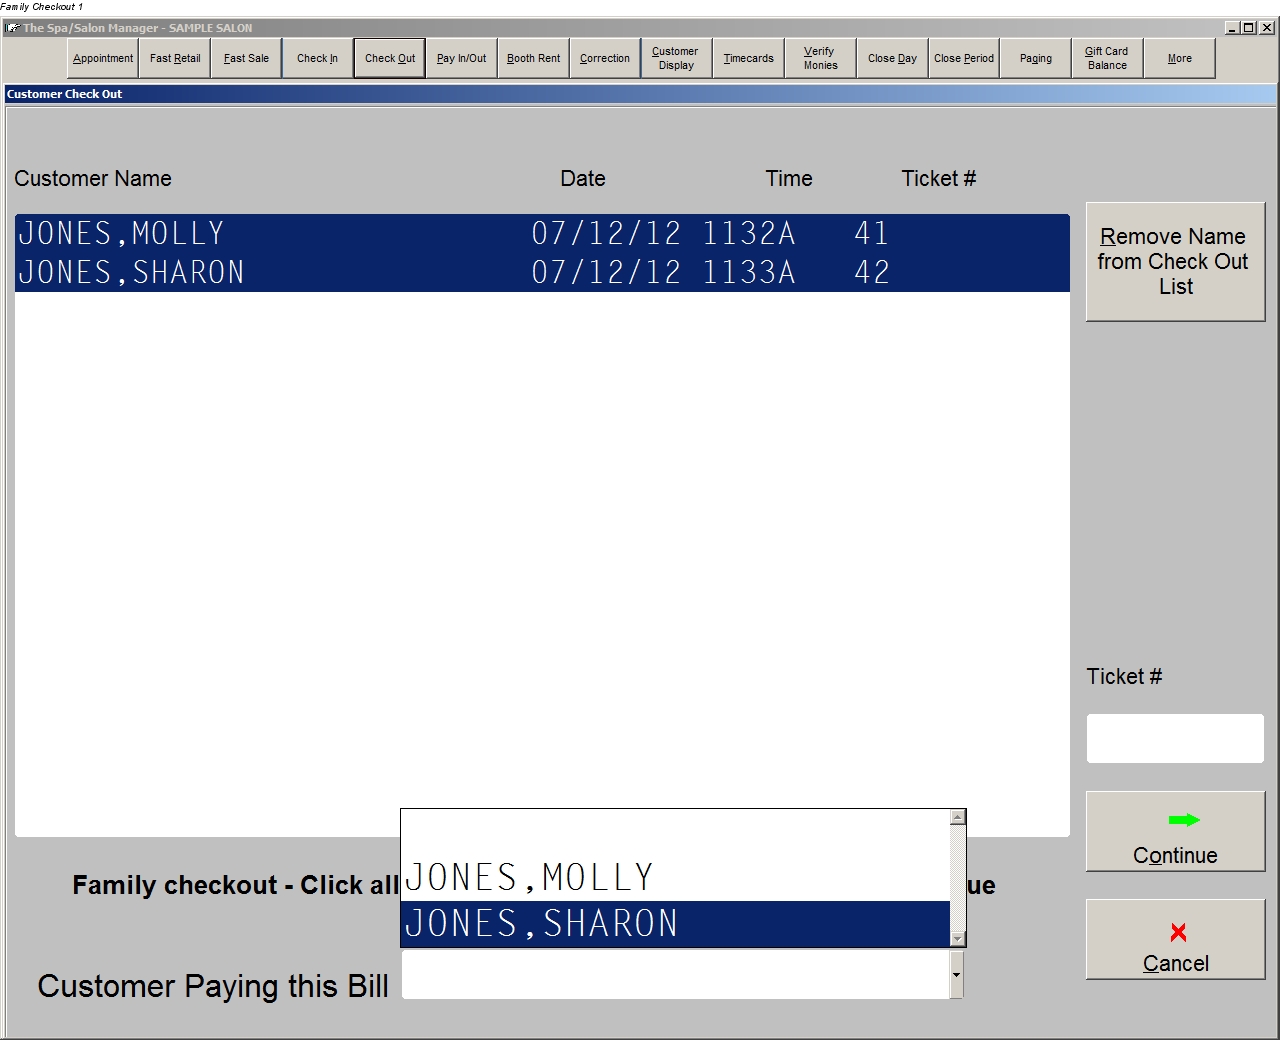
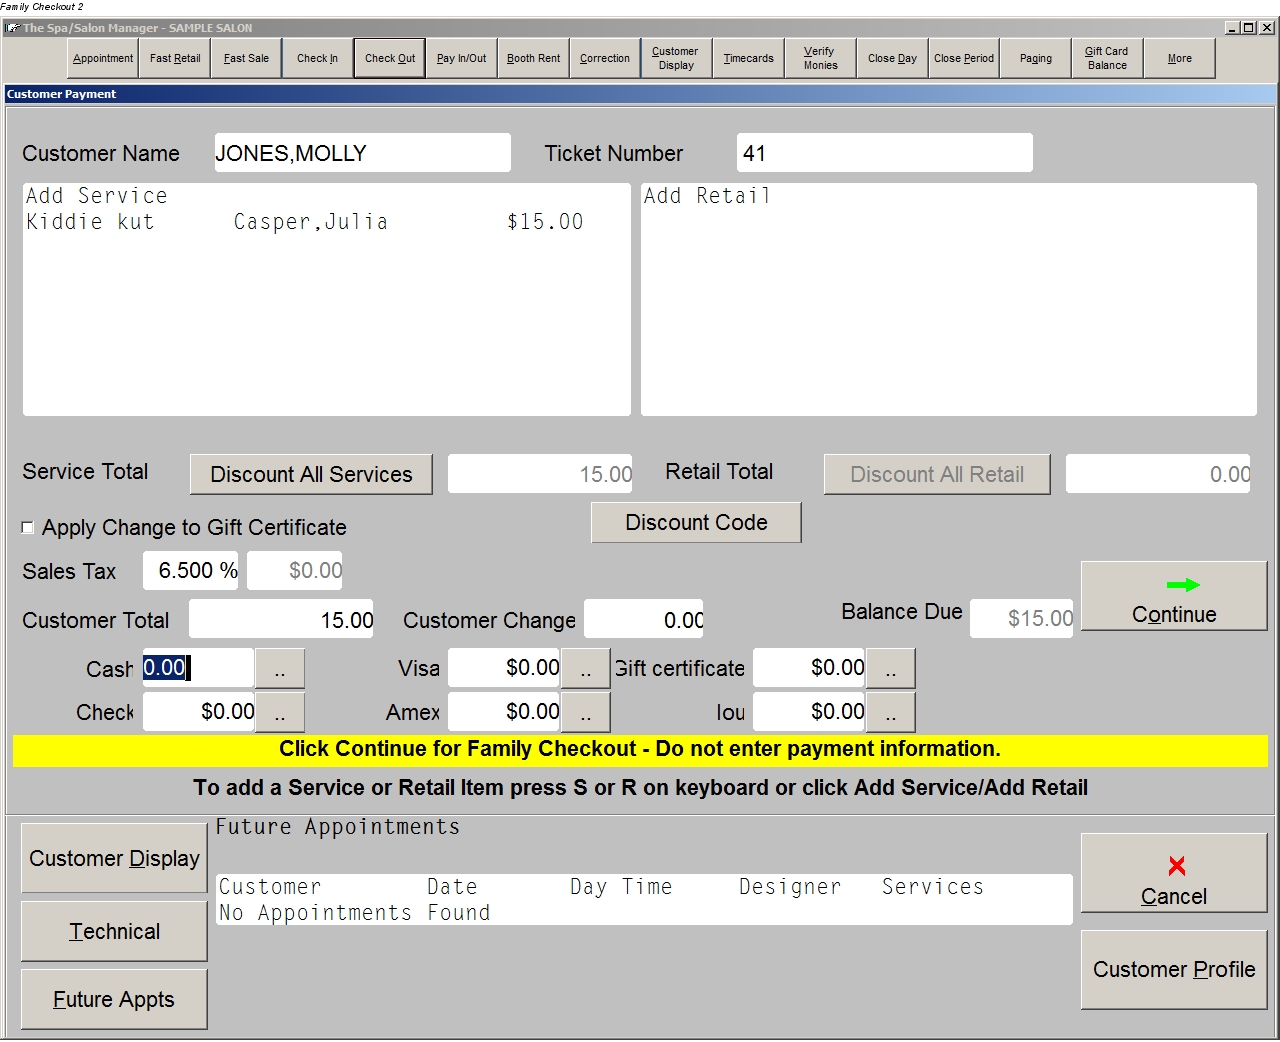
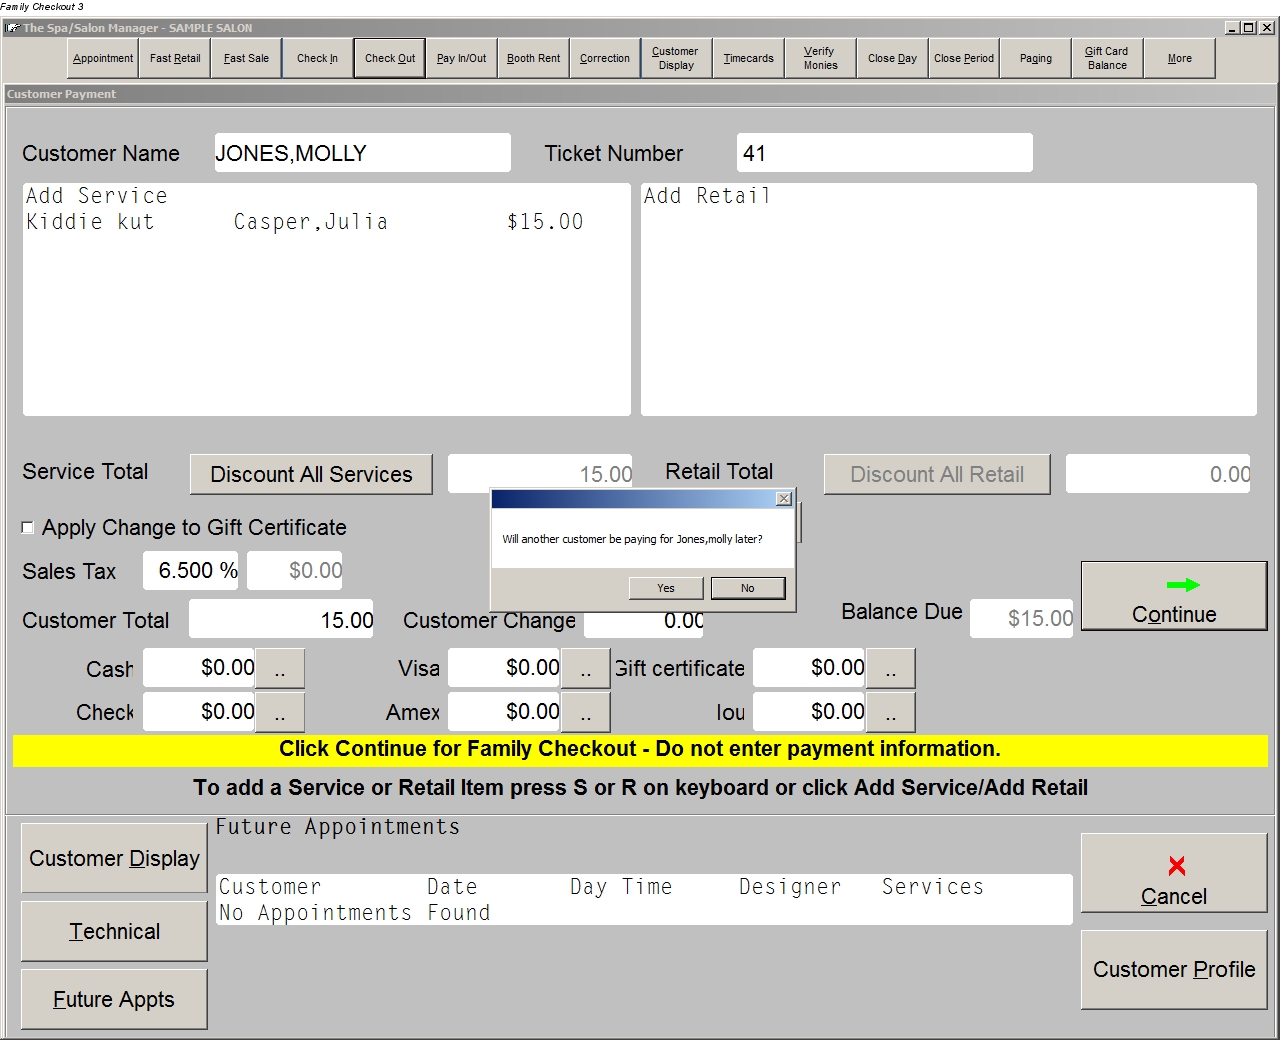
After this step, you'll have a typical checkout screen for the first customer. The only difference is a message that shows in yellow beneath the payment lines: "Click Continue for Family Checkout - Do not enter payment information". Fill in everything as you would normally - services, retail items, discount codes, etc. Once you have the correct information entered for that customer, hit Continue without entering a payment. The program will ask you if someone will be paying the bill later - answer Yes to this question. This will take you to the next customer - just repeat these steps for every customer until you get to the last customer - the one we selected earlier as paying the bill.
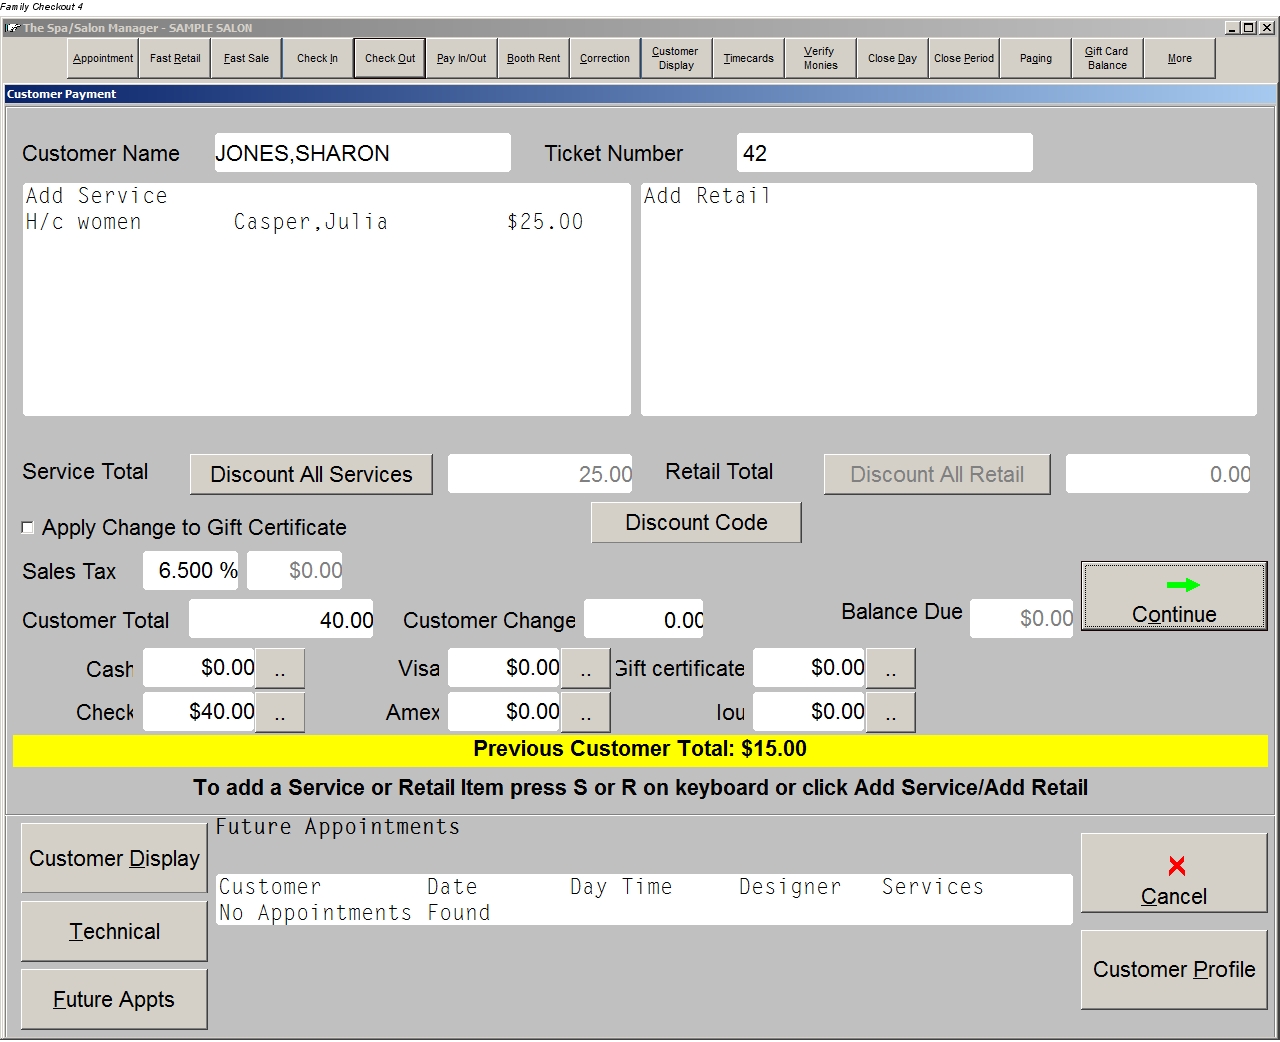
When you get to the last customer you'll see a new message in yellow beneath the payment lines: "Previous Customer Total: $XXX.XX". This message shows the amount that's carried forward from all the other customers. Fill in everything as you would normally again - services, retail items, discount codes, etc. You'll notice then that the Customer Total reflects the Service and Retail totals from this customer as well as the Previous Customer Total shown in yellow. At that point, enter the correct payment and click Continue. You're done with the Family Checkout!
On the bookkeeping end of things, all the customers that did not pay the bill will show up as paying with cash. The customer that paid the bill will show up as getting change in an amount that covers the rest of those sales. This reflects what actually happen - one customer paid over the amount for their bill, received change, and used that change to pay for other customers.
Family Checkout remains a powerful tool to speed up the checkout process for families, wedding parties, or any other type of group. Cloud customers already have the new features from Family Checkout and non-Cloud customers can do a Web Update to get the most recent version of the program. As always, please contact support with any questions.
Before anyone panics, there's nothing to relearn after the upgrade. We've kept the steps the same as they've always been but added some helpful messages to the checkout screen as well as made it possible to see the Previous Customer Total and the Balance Due at the same time. It's still the same easy process you've been using - we've just added more information to help new users know what to do at each step along the way.
The first step in using Family Checkout is checking in all the customers that will be a part of the sale. You can do that from the appointment book by clicking on the appointment and clicking Check In on the following screen or by using the Check In menu button at the top of the screen. Make sure to check in all the customers that are paying together first.
Next, go to the Check Out menu button at the top of the screen. This comes up with a list of currently checked in customers which will include all the customers you just checked in. Click all the names that are checking out together - the program will highlight all the customers. Once you've selected at least two customers you'll notice that the bottom of the screen shows a new box - Customer Paying this Bill. Once you've selected all the customers for this ticket you can pick one of those customers from that list as the person that will pay for the bill. That customer will be the last one checked out and their total will show the total from all the other sales as well as their own. Once you've selected the customer paying the bill, click Continue to move on to the next step.
After this step, you'll have a typical checkout screen for the first customer. The only difference is a message that shows in yellow beneath the payment lines: "Click Continue for Family Checkout - Do not enter payment information". Fill in everything as you would normally - services, retail items, discount codes, etc. Once you have the correct information entered for that customer, hit Continue without entering a payment. The program will ask you if someone will be paying the bill later - answer Yes to this question. This will take you to the next customer - just repeat these steps for every customer until you get to the last customer - the one we selected earlier as paying the bill.
When you get to the last customer you'll see a new message in yellow beneath the payment lines: "Previous Customer Total: $XXX.XX". This message shows the amount that's carried forward from all the other customers. Fill in everything as you would normally again - services, retail items, discount codes, etc. You'll notice then that the Customer Total reflects the Service and Retail totals from this customer as well as the Previous Customer Total shown in yellow. At that point, enter the correct payment and click Continue. You're done with the Family Checkout!
On the bookkeeping end of things, all the customers that did not pay the bill will show up as paying with cash. The customer that paid the bill will show up as getting change in an amount that covers the rest of those sales. This reflects what actually happen - one customer paid over the amount for their bill, received change, and used that change to pay for other customers.
Family Checkout remains a powerful tool to speed up the checkout process for families, wedding parties, or any other type of group. Cloud customers already have the new features from Family Checkout and non-Cloud customers can do a Web Update to get the most recent version of the program. As always, please contact support with any questions.
Thursday, January 3, 2013
Loyalty Program
We’ve had a loyalty program in The Spa/Salon Manager for a few years
now but I took some time at the end of the year this year to improve it,
make it easier to set up, and easier to use. Given these changes I
wanted to take a moment to explain how the Loyalty program works.
We’ve designed the Loyalty program with simplicity in mind. You’ll start by going to Maintenance -> Loyalty -> Loyalty Program Settings. On this screen you can choose some basic settings that will govern how your customers accumulate points. We provide separate lines for Service Dollars per Point, Retail Dollars per Point, and Gift Certificate Dollars per Point. If you set those boxes to $20, $10, and $50 respectively then customers would receive one point for every $20 of service sales, $10 of retail sales, and $50 of gift certificate purchases. The system assigns points down to the penny so in our example every $0.20 of service sales would give 0.01 points. In addition to these three settings you can assign bonus amounts to each day of the week for the three numbers. Extending our earlier example we could click the Thu box on the Service Dollars per Point line and put in 10 for the percent bonus. Then instead of getting 1 point for every $20 spent the customer would get 1.1 points on Thursdays – a 10% bonus.
Most salons can ignore the Location line (this only applies to stores that are running centralized gift certificates through us for multiple locations). The last part you need to set up is the method for assigning Loyalty ID’s. If you don’t use the Loyalty program yet we show No Loyalty Program here. Your other two options are to Assign Loyalty ID Manually at Check In or to Automatically Assign Loyalty ID at Check In. If you have loyalty cards that you’ll be giving to the customers (like our plastic gift cards we offer) then you’ll want to choose the Assign Loyalty ID Manually at Check In option. If you’d like to have the program manage the ID numbers for you then you’ll choose the Automatically Assign Loyalty ID at Check In option.
Once you finish on the Loyalty Settings screen the program will automatically add the Transaction Type and Pay In/Out category of Loyalty for you. If you’re out of space and don’t have Loyalty in the system yet the program will warn you and tell you to contact support for help in adding the category. It’s critical that you get the Loyalty option added – customers will use Loyalty as their payment method when using their accumulated points to pay for part or all of a sale.
Our Loyalty program is an ‘opt-in’ program. This means that until you assign an ID# on the Customer Display/Check In screen the customer does not accumulate points. Once you’ve assigned an ID# customers will start accumulating points and you’ll be able to see their current point balance at the bottom of the Check Out screen near the Continue button. It’s up to each salon to decide when you want to allow customers to use their accumulated points. The program will allow you to use them when you’re entering a payment on the Check Out screen but each salon could train their staff to put in policies such as requiring at least $10 worth of points used, only allowing Loyalty as a payment for retail purchases, or any other restrictions the salon wanted to place on these redemptions.
We’ve designed the Loyalty program with simplicity and flexibility in mind. We hope that these few simple options will allow a variety of discount programs for our salons. If you have any questions with how to make our Loyalty program work for you, don’t hesitate to contact our tech support department.
We’ve designed the Loyalty program with simplicity in mind. You’ll start by going to Maintenance -> Loyalty -> Loyalty Program Settings. On this screen you can choose some basic settings that will govern how your customers accumulate points. We provide separate lines for Service Dollars per Point, Retail Dollars per Point, and Gift Certificate Dollars per Point. If you set those boxes to $20, $10, and $50 respectively then customers would receive one point for every $20 of service sales, $10 of retail sales, and $50 of gift certificate purchases. The system assigns points down to the penny so in our example every $0.20 of service sales would give 0.01 points. In addition to these three settings you can assign bonus amounts to each day of the week for the three numbers. Extending our earlier example we could click the Thu box on the Service Dollars per Point line and put in 10 for the percent bonus. Then instead of getting 1 point for every $20 spent the customer would get 1.1 points on Thursdays – a 10% bonus.
Most salons can ignore the Location line (this only applies to stores that are running centralized gift certificates through us for multiple locations). The last part you need to set up is the method for assigning Loyalty ID’s. If you don’t use the Loyalty program yet we show No Loyalty Program here. Your other two options are to Assign Loyalty ID Manually at Check In or to Automatically Assign Loyalty ID at Check In. If you have loyalty cards that you’ll be giving to the customers (like our plastic gift cards we offer) then you’ll want to choose the Assign Loyalty ID Manually at Check In option. If you’d like to have the program manage the ID numbers for you then you’ll choose the Automatically Assign Loyalty ID at Check In option.
Once you finish on the Loyalty Settings screen the program will automatically add the Transaction Type and Pay In/Out category of Loyalty for you. If you’re out of space and don’t have Loyalty in the system yet the program will warn you and tell you to contact support for help in adding the category. It’s critical that you get the Loyalty option added – customers will use Loyalty as their payment method when using their accumulated points to pay for part or all of a sale.
Our Loyalty program is an ‘opt-in’ program. This means that until you assign an ID# on the Customer Display/Check In screen the customer does not accumulate points. Once you’ve assigned an ID# customers will start accumulating points and you’ll be able to see their current point balance at the bottom of the Check Out screen near the Continue button. It’s up to each salon to decide when you want to allow customers to use their accumulated points. The program will allow you to use them when you’re entering a payment on the Check Out screen but each salon could train their staff to put in policies such as requiring at least $10 worth of points used, only allowing Loyalty as a payment for retail purchases, or any other restrictions the salon wanted to place on these redemptions.
We’ve designed the Loyalty program with simplicity and flexibility in mind. We hope that these few simple options will allow a variety of discount programs for our salons. If you have any questions with how to make our Loyalty program work for you, don’t hesitate to contact our tech support department.
New Feature - Stored Reports
Did your printer run out of paper? Did you forget to print a report?
Or did you just want another copy of a report later but not want to wait
for the program to create the report again? Our new Stored Reports
feature does all that and more!
Owners can access the Stored Reports button under the Reports section. It’s a new button on the left where we list the different types of reports (Receptionist Reports, Manager Reports, etc). Once you’ve updated your system to a version of the program with Stored Reports we will store any Mailing Reports you pull up from that point forward for quick access later. We automatically keep the last 90 days worth of these Mailing Reports. Better yet, you can select any of those reports and click the Save Report Permanently option to keep it even after the 90 days are up.
In the future, I’ll be adding even more reports to this section as well as looking for ways to have certain reports get stored automatically at night, but for now I hope everyone enjoys this new feature!
Owners can access the Stored Reports button under the Reports section. It’s a new button on the left where we list the different types of reports (Receptionist Reports, Manager Reports, etc). Once you’ve updated your system to a version of the program with Stored Reports we will store any Mailing Reports you pull up from that point forward for quick access later. We automatically keep the last 90 days worth of these Mailing Reports. Better yet, you can select any of those reports and click the Save Report Permanently option to keep it even after the 90 days are up.
In the future, I’ll be adding even more reports to this section as well as looking for ways to have certain reports get stored automatically at night, but for now I hope everyone enjoys this new feature!
Wednesday, December 5, 2012
Online Gift Card Sales
As I wrote back in June,
the Spa/Salon Manager program makes it easy to sell gift certificates
to your customers without dealing with the per-transaction fees that
banks and credit card processors charge to load and redeem their gift
cards. We have extended that same ability to your website allowing your
customers to print beautiful gift certificates directly from the web.
Best of all your employees don't have to handle the checkout process or
the shipping!
To make all of this work you'll need a few services in place first. Online gift certificate sales are part of our Online Booking service so you'll need Online Booking to start selling gift certificates online. You'll also need a shopping cart account from CartManager - we'll help you get signed up for an account with them, get everything set up correctly, and you're ready to go. Finally, you'll need a way to process the payments that come in to CartManager - Accelerated Payments/X-Charge is a great choice that also integrates with the Spa/Salon Manager point of sale features.
Once you're set up with these three pieces in place we'll work with you to prepare custom artwork for your printable gift certificate. It's even possible to use more than one gift certificate picture which allows you to switch up your artwork with the seasons or with special offers that come up. A good web developer will be able to design a site for you that includes different gift card packages with different artwork for the cards or you can have us make your web site for you.
We also offer the ability to sell discounted or bulk gift cards. You could set up a sale of five $20 gift cards for $80. You could offer a free $20 gift card with the purchase of a $100 gift card. The system is flexible enough where you just decide a final bill amount and a face value for each gift certificate and your web developer can easily make that special available to your customers.
Call us today to get started with Online Gift Card Sales.
To make all of this work you'll need a few services in place first. Online gift certificate sales are part of our Online Booking service so you'll need Online Booking to start selling gift certificates online. You'll also need a shopping cart account from CartManager - we'll help you get signed up for an account with them, get everything set up correctly, and you're ready to go. Finally, you'll need a way to process the payments that come in to CartManager - Accelerated Payments/X-Charge is a great choice that also integrates with the Spa/Salon Manager point of sale features.
Once you're set up with these three pieces in place we'll work with you to prepare custom artwork for your printable gift certificate. It's even possible to use more than one gift certificate picture which allows you to switch up your artwork with the seasons or with special offers that come up. A good web developer will be able to design a site for you that includes different gift card packages with different artwork for the cards or you can have us make your web site for you.
We also offer the ability to sell discounted or bulk gift cards. You could set up a sale of five $20 gift cards for $80. You could offer a free $20 gift card with the purchase of a $100 gift card. The system is flexible enough where you just decide a final bill amount and a face value for each gift certificate and your web developer can easily make that special available to your customers.
Call us today to get started with Online Gift Card Sales.
Monday, October 29, 2012
Getting More with Less Paper
Our owner Kent's wait for his new electric car
got me thinking about ways you can use features in our program to cut
your paper use, help the environment, and at the same time make it
easier to use the program. We have a lot of features that help reduce
paper usage - I'd like to cover some of them here.
We have many salons that print a Close Day Summary every day. You can print these reports at any time though - there's no need to print the report for a paper record. Also, our Cloud owners could get access to the report from their home computer any time from any of their connected devices. While it's just one piece of paper a day it's one piece that a lot of salons end up throwing away once they print it.
Printing work tickets takes a lot of paper. Some salons will want to continue printing these as they do provide valuable information. However, it's possible to work around the need for these work tickets - especially if you have extra computers on the floor for staff to use. Rather than using the work tickets to look up customer history, employees could use an extra computer on the floor to look up information as they need it. In addition, the Pre-Price feature allows service providers to enter any add-on services or pricing changes from a walk-up computer instead of writing them in on the work tickets. It saves paper and prevents mistakes at the front desk.
Printing schedules takes up a lot of paper as well. We offer a few ways you can do without paper schedules. First, walk-up stations allow employees to see their appointments - including new changes that a printed schedule could miss - without paper and without walking to the front desk. In addition, the Paging feature of the program allows employees with text-capable phones to receive notifications for any schedule updates. Finally, both the Cloud and Online Booking features allow employees with smart phones to see their schedule directly on their phones. These options are far more powerful than a printed schedule and give another opportunity to cut your paper use.
Lastly, the powerful Send Email feature in our program can help you cut both costs and paper usage by replacing some of your print advertisements with email marketing. You can easily send out your email marketing to all customers with email addresses and then target your print marketing to only go to people you couldn't reach by email.
These are just a few ideas off the top of my head for reducing paper usage with the program. There's so much you can do now without using paper. Between our Online Booking, our Cloud program, and the Paging feature you can extend access to the program to a variety of devices which will reduce your reliance on printing. You'll save money and in a small way help the environment as well.
We have many salons that print a Close Day Summary every day. You can print these reports at any time though - there's no need to print the report for a paper record. Also, our Cloud owners could get access to the report from their home computer any time from any of their connected devices. While it's just one piece of paper a day it's one piece that a lot of salons end up throwing away once they print it.
Printing work tickets takes a lot of paper. Some salons will want to continue printing these as they do provide valuable information. However, it's possible to work around the need for these work tickets - especially if you have extra computers on the floor for staff to use. Rather than using the work tickets to look up customer history, employees could use an extra computer on the floor to look up information as they need it. In addition, the Pre-Price feature allows service providers to enter any add-on services or pricing changes from a walk-up computer instead of writing them in on the work tickets. It saves paper and prevents mistakes at the front desk.
Printing schedules takes up a lot of paper as well. We offer a few ways you can do without paper schedules. First, walk-up stations allow employees to see their appointments - including new changes that a printed schedule could miss - without paper and without walking to the front desk. In addition, the Paging feature of the program allows employees with text-capable phones to receive notifications for any schedule updates. Finally, both the Cloud and Online Booking features allow employees with smart phones to see their schedule directly on their phones. These options are far more powerful than a printed schedule and give another opportunity to cut your paper use.
Lastly, the powerful Send Email feature in our program can help you cut both costs and paper usage by replacing some of your print advertisements with email marketing. You can easily send out your email marketing to all customers with email addresses and then target your print marketing to only go to people you couldn't reach by email.
These are just a few ideas off the top of my head for reducing paper usage with the program. There's so much you can do now without using paper. Between our Online Booking, our Cloud program, and the Paging feature you can extend access to the program to a variety of devices which will reduce your reliance on printing. You'll save money and in a small way help the environment as well.
Friday, September 28, 2012
SpaSalon Manager - Now on Facebook!
Ever since we rolled out our new website back in May we've been
looking to put more and more information about our program and our
company where our customers can see it. We want you to get to know us
as well as how the program operates. That entire time we've worked hard
on something behind the scenes and I'm very happy to announce that
we're now ready to unveil our company site on Facebook!
When we first discussed creating a Facebook page we were hesitant. We have so much great content on our new web site that there were questions about whether we could create something for Facebook that could add anything to what we already had. Once we got started though the answer became clear - we had a lot to say that didn't lend itself well to showing on a traditional web page.
Our Timeline page allowed us to tell the story of our company in a way that a simple web page could not. You can see the story of our company from its founding in 1985 to the present day illustrated in pictures. We have our newsletters, pictures of manuals and other materials from the early days of the business, as well as pictures of our employees and business owners that worked with us at our trade shows. They work together to tell a complete story of our business as it grew from Kent Crabtree writing a program for his parent's salon in 1985 to the business it is today.
Our Home Page section pulls together parts of our current web page like the blogs, the sign-up for a free trial, and links to our support and sales pages. This should make it easier for everyone to find exactly what they need. In addition there is a Training Videos section there where we give the same type of step-by-step support we offer over the phone to everyone on Facebook. Our growing list of videos give simple instructions that both teach new users how to use the program as well as show what each part of the program can do for you.
I hope you enjoy our new Facebook page! Give it a look, Like us, and feel free to leave comments! I'll personally be very active on the site and look forward to hearing from you there.
Last minute addition: We now have a business twitter account, @spasalonmanager. Feel free to contact us there!
When we first discussed creating a Facebook page we were hesitant. We have so much great content on our new web site that there were questions about whether we could create something for Facebook that could add anything to what we already had. Once we got started though the answer became clear - we had a lot to say that didn't lend itself well to showing on a traditional web page.
Our Timeline page allowed us to tell the story of our company in a way that a simple web page could not. You can see the story of our company from its founding in 1985 to the present day illustrated in pictures. We have our newsletters, pictures of manuals and other materials from the early days of the business, as well as pictures of our employees and business owners that worked with us at our trade shows. They work together to tell a complete story of our business as it grew from Kent Crabtree writing a program for his parent's salon in 1985 to the business it is today.
Our Home Page section pulls together parts of our current web page like the blogs, the sign-up for a free trial, and links to our support and sales pages. This should make it easier for everyone to find exactly what they need. In addition there is a Training Videos section there where we give the same type of step-by-step support we offer over the phone to everyone on Facebook. Our growing list of videos give simple instructions that both teach new users how to use the program as well as show what each part of the program can do for you.
I hope you enjoy our new Facebook page! Give it a look, Like us, and feel free to leave comments! I'll personally be very active on the site and look forward to hearing from you there.
Last minute addition: We now have a business twitter account, @spasalonmanager. Feel free to contact us there!
Subscribe to:
Posts (Atom)